Sunday, March 23, 2025

All Buttoned Up - Project Quilting Final Challenge

 Button, button, who has got the button?  Is there a seamstress among us who hasn't got a tin or jar full of random buttons, ready to be used for any purpose?  I surely do have plenty of buttons, so I was ready for this challenge!  Now, the question is what shall I make that includes a button?


I chose to make a coffee cozy for work.  We often go down to the coffee shop at the end of the block by the quilt shop and every time I say that I should make a nice cozy, but do I ever remember at home?  No.


I have a little decorative jar of green and white buttons, so I checked that one out first and found the perfect buttons for my project.  The ones I chose have a curved bottom with a bit of a shank built in, perfect for my elastic to sit under yet not be too bulky!

I changed from the 1/4 inch elastic to a 1/8 inch.  This goes between the top and bottom layers of fabric.


The next step is to sew the buttons onto the front of the cozy.  I measured where I wanted the buttons to be first so it would fit well.


And voila, a finished cup cozy!  I'll pop this in my purse to have next time I visit the coffee shop and be able to hold my cup more comfortably!

Linking up for the final challenge!

Saturday, March 22, 2025

Happy Birthday to my Hubby!

 I decided to make this months UFO into a quilt for my husband, he's been hinting that he needs a cozy new quilt for napping under!  This quilt is perfect for him, not only is it beautiful and good colors for him, but it's a great remembrance of our big road trip in 2022!


My original plan was to use this gold for the sashing.  I liked it, but got to thinking that he might prefer blue as that is his favorite color.


I had enough yardage of this light blue, but it didn't thrill me at all


Then I tried this one and knew I had the winner!  I had to do some math and discovered that a skinny binding  would work the best and it would keep the quilt at a good size so it wouldn't be too large.  

So pretty!  I was halfway done by Wednesday.  I didn't get it done for his birthday on Thursday, but completed sewing the top on Friday morning and presented it to him!  He's excited for me to get it finished!


Just a quick snap on the floor on a rainy day, but you can see how pretty it is!  I've got a dark blue backing and will bind it with the sashing color.  This one is going to get a double layer of poly batting for lots of fluff and I will tie it with dark blue embroidery floss.  I know he will enjoy cuddling with it and remembering our trip!


If you would love to have the pattern for this, it's available here.  The pattern includes all 56 nine inch quilt blocks with basic piecing instructions.  There are also finishing directions using sashing and cornerstones with an outer border to make a 84 x 94.5 inch quilt.


Sunday, March 16, 2025

Hometown Nostalgia Row Quilt Row 3 - Variable Star

 This week has been a water-logged mess!  Not only has it been pouring outside, but we've been working hard on diagnosing a water leak in our house that has been causing a huge increase in our water bill!  We did find the source (the fill valve in our upstairs bath was running continually!) and stopped that leak, and you can't do anything about the weather other than complain, so I will turn the subject back to a more pleasant one - the next row for the Hometown Nostalgia Quilt. But first, here is Row 2 all finished:


I loved working with the pink, so pretty!  Now it's time to switch up colors and I am choosing to use green for this one.  A nice happy spring green to celebrate all the green popping out on the trees and bushes!  The block is a Variable Star (also referred to as a Sawtooth Star). This is a star sewn as an uneven nine patch, often using flying geese for the star points.  This took me a little more effort to write up since I wanted to share three different methods for making the Flying Geese.


My usual method for making Flying Geese is the traditional style - pieces are cut to the exact size needed and sewn together.  The pros for this method are that you don't have to trim your units down and it makes it easy to use small scraps.  The cons are that you have to cut 1/8 inch increments, which some quilters don't like very much, you have to trim dog ears, and if you aren't accurate, you might have wonky units.


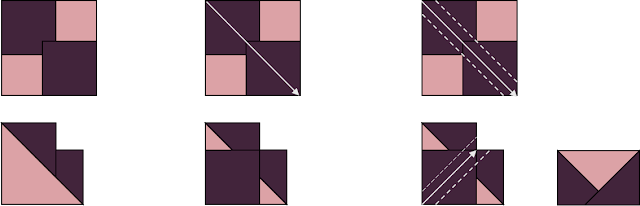
Another method is to use the sew and flip technique.  Pros are that this method eliminates having to cut triangles, and you don't have dog ears to trim.  It's also great for smaller mini blocks.  Cons are that you have to draw a line to sew on, especially for larger units and you can also get wonky units with this method and it does use a bit more fabric. 


The third method is to use a specialty ruler to make your blocks.  Pros for this method are that you get a perfect block if you follow the directions!  Cons are that you need to have the special ruler, and there is a small amount of waste as you trim to the proper size after sewing.  


Just a note - you can skip the specialty ruler and use a regular ruler, but you do have to be sure you are cutting to the correct measurement.  

If you don't have a lot of experience with making Flying Geese, try the different methods and see what you prefer!  I go back and forth, but I think I will make the rest of my blocks with the specialty ruler - I really like how perfectly my block using this method came out!  

Two rows down, let's get going on the third!  Hope you are enjoying it!  You can download instructions for the third row below: