I didn't know if I was going to be able to get this finished by today or not, but I did it! The piecing went a bit faster since this is my second version, and I opted for a quicker quilting finish on this one.
The spools came out so pretty! I chose the colors from a charm pack with the new colors of Kona Solids. The background is Snow. My favorite almost white solid - I will need to stock up again soon, I have another quilt that will use this one.
I found this spool's match waiting for me on the shelf today! I wanted to use it for the quilting, but then I dug around and found this awesome variegated thread. I wonder if it is available in the 50 wt cotton spool? It is Poly Filament 5505 - made for longarm machines, but it quilted up perfectly on my Juki! Love the colors, it was just right for my little quilt!
For my piecing I used my usual 50 wt choice - color 2000. It's a perfect neutral for this kind of piecing. The thin thread makes your seams lay better, and is still sturdy enough for foundation paper piecing.
I thought it would be fun to quilt it all over with loopy threads!
Check out our selection of Aurifil at the shop. This is where I bought my first spool of Aurifil and I have never looked back!
I finished the edges with a neat no-binding technique! I will share about that later, though.
This pattern is by Whole Circle Studio and it's free! It's easy to follow and makes a wonderful little wall hanging, or you could make more blocks and put them together into a bigger quilt.
And of course, Aurifil thread! Aurifil is sponsoring a contest and giveaway here. My quilt is number 14, so I hope you go check out all the quilts, and maybe vote for mine! Whether I win or not, I really enjoyed making this quilt (twice, even!) It was a lot of fun and I can't wait to see the other entries.
Linking up with Busy Hands Quilts for Finished or Not Fridays. I am so glad it is finished!
Oh, look! A sunny day this week - yippee! We are sure looking forward to summer here. The rain has been crazy. I feel like I am pretty much used to it, but I am really looking forward to sunnier days, hopefully soon. At least playing with the bright batiks gives me a little comfort
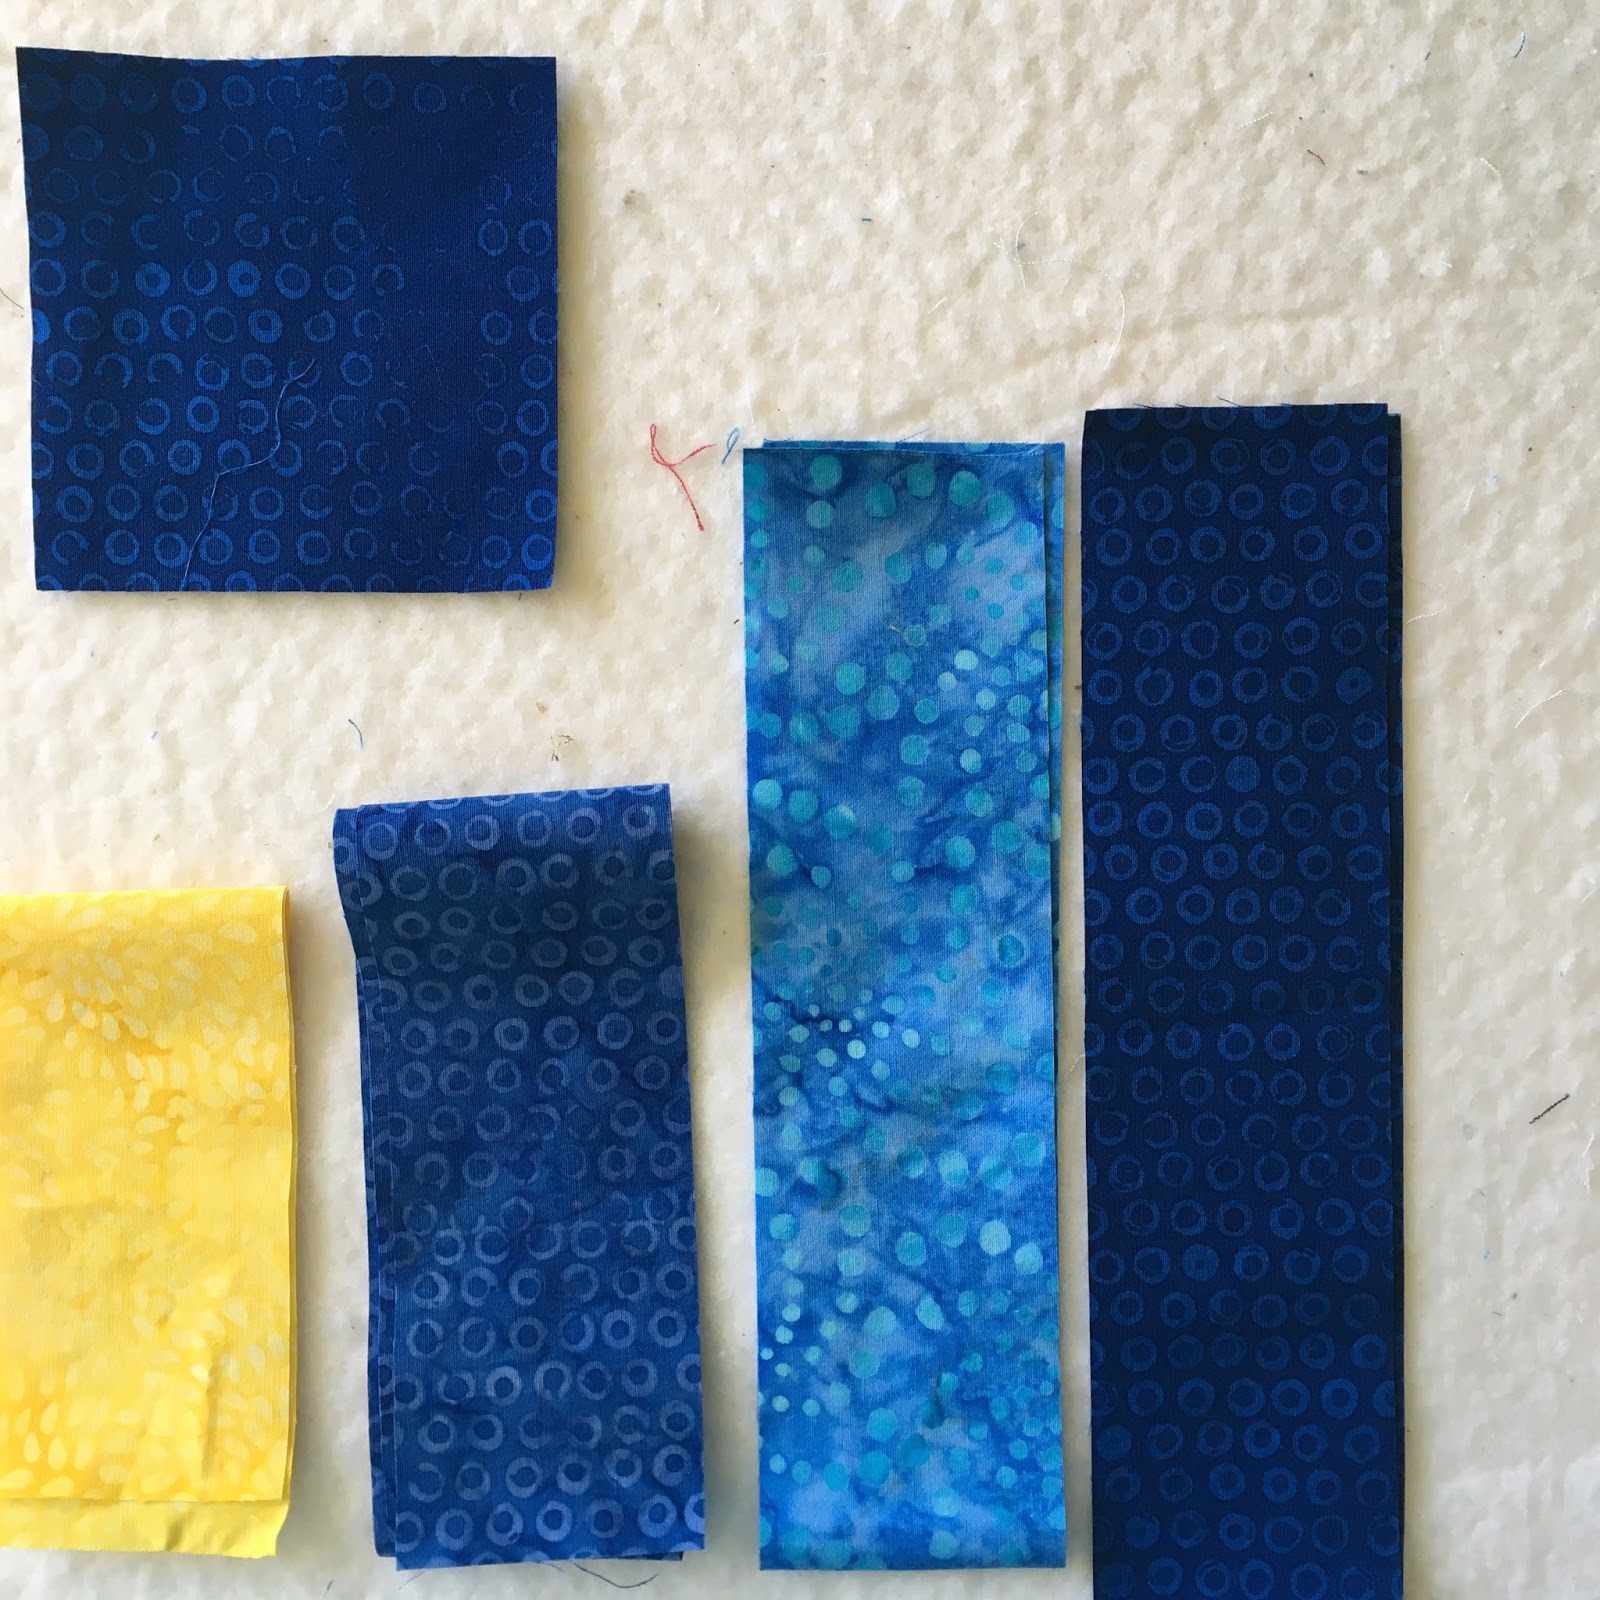
I have one last block using Four Patch units for you today. This block is a Chained Friendship Star. When you put them together in a quilt you get a neat chained effect from the Four Patch corners.
To make this block you will need four half square triangles and a center square from your star color, four half square triangles and one strip (2 x 17) from your background color, and one strip (2 x 17) from your chain color.
Sew all four half square triangle units, then use the strips to sew 4 Four Patch blocks. Arrange to make a star with chain corners:
Sew together, pressing seams away from half square triangle units:
This completes our fourth block for the Four Patch Unit! Next week I'll have a new unit and a newsletter for you - I can't believe we are already a fourth of the way done with the Quilter's Recipe Box series. I hope you are enjoying following along!
Squint your eyes a bit and you can see the chain effect from the corners of these blocks!
Here is a fun little quilt I designed in EQ7 using the chained block alternating with the plain block:
Setting them on point gives it a whole new look! This would be a fun quilt for a patriotic holiday, or to make as a quilt to honor someone who is in the military. If you have EQ7 and would like to add this project to your sketchbook you can download it here:
This file will only work if you have EQ7 on your computer - just download and click to open. If you make the quilt, send me a picture, I'd love to see it in fabric. Thanks for quilting along with me!
I was determined to do some fun sewing yesterday, so started out working on a new sample for my CityScape pattern. Then I realized that I cut two strips wrong and needed more fabric to make it work. UGH! I REALLY didn't want to go anywhere, so I decided to work on the Sew Many Colors mini out of Kona cottons. The first one I did was in batiks, but I did want to make one to enter the contest with (and it's so cute I just had to make another one anyway!) Finding Kona cotton is a little tough here, so I ordered a Charm Pack of the new colors for my spools. There was also an orange that worked great for the spool ends, too. I had a half yard of Snow in my stash so I was set to get started.
After a couple of episodes of Dr Who I was this far! So I decided I might as well finish those last two spools and finish the top.
The deadline is Friday, so I need to figure out how I want to quilt this one and get going. At this point it was nearly time for dinner and I thought I should maybe tidy up the sewing room. I started out by sewing some 2 inch strips together for my crocheted rug, and started digging through a shoebox I unearthed from under my sewing table earlier. Well, there weren't really many 2 inch strips in there, but there were a ton of odd and ends of scraps. I remembered that I had intended to do some scrappy patchwork blocks out of them. I thought that maybe I would sew a few up and reduce the amount in the box.
I just pulled random pieces and sewed them log cabin style. I made two full 12 1/2 inch blocks and two smaller blocks yesterday, but my scrap bin seemed just as full as when I started. I don't know if I will ever be able to empty this box, but I guess it will be fun trying! Today I finished up six more blocks. My bin is a little emptier, but I did pull some strips out of my big scrap bin because most of what is in the box is smaller pieces, and I needed more longer strips to finish the blocks up.
They are just totally scrappy. Whatever I have that fits gets sewn on.
We'll see how many blocks I get done before I get bored with the project - I've found that I am better at starting than finishing, especially with a project that isn't planned out or has a purpose.
Linking up with Quilting is More Fun Than Housework for Oh Scrap!
I was very delighted that our March challenge was Miniature quilts because I do love making miniatures! I can remember loving small things even as a child - making dollhouses out of cardboard boxes and filling them with furniture. I remember a neighbor lady showed me how to make a fabulous chair out of a soup can one day. My favorite doll was a 6 inch high Dawn doll and since I was getting interested in sewing I had tons of ideas for making her outfits! My friends and I liked collecting the small troll dolls as well - but they were a little harder to dress. Those squatty bodies always looked funny in everything we made!
I'm still very delighted by tiny things and making mini quilts is just fun for me. For this challenge I was all set to make a quilt from the Carol Doak Miniature book, but then when I was blog-reading I found the Sew Many Colors pattern and changed my mind.
I'm trying to think of some basketball analogies, but nothing fits! I guess I'll have to go with baseball - it's a home run - a mini quilt, made out of Island Batik and Aurifil thread. Three of my favorite things.
It was fun to hunt through my Island Batik fabrics looking for colors I liked for the spools - I only needed a small piece for each spool, so scraps were perfect for this project. (Definitely one of my favorite things about mini quilts!)
I love the stripey green! Perfect for a spool of thread, don't you think?
Before I knew it, I had the whole quilt pieced!
Now to decide how to quilt it! I decided to do an all over grid. I really didn't want to mess with marking it, so I decided that I could probably eyeball 1/2 inch spacing and started stitching!
I would stitch three lines to the right of the last line, then turn the quilt, and stitch 3 lines on the next side. I had to do a little adjusting when I got near the edge, but it really doesn't show much. Trim, add binding, and my quilt is finished!
I love it to death! In fact, I plan on rearranging my mini wall to make the perfect place to feature this quilt!
Sew Cute! I love foundation paper piecing with Island Batik fabrics! They press perfectly and are so easy to work with. And the colors - always beautiful! I also used Aurifil 50 weight thread for the piecing and quilting of this quilt, I love the subtle look of quilting with it, and it's perfect for tiny seams because it lays so flat, even with the stitch length shortened for the foundation piecing.
I can't say that paper piecing in necessarily my favorite technique, but I found a couple things that do make it a bit easier. I happened upon a video showing the Seam Allowance Guide from George Siciliano. (It's a long video, but when I saw it, I knew I needed this ruler!)
I ordered it and used it to make this quilt, and it was super great! It is so nice to have this one tool that you can use to fold your paper over, then make your cut with the ruler part. Plus it can be used to cut 1/8 inch seams as well! There is a bit of a learning curve with the cutting because of the thickness. You do have to make sure to hold your rotary cutter straight and not angle the blade, because that will give you wonky cuts. But I do love it, and probably will order the 12 inch quide soon. The 8 inch guide was just barely big enough for some of the pieces in this quilt because of the weird angles.
The second thing I tried for the first time is June Tailor Foundation sheets. They are a little spendy, but I really wanted something lighter than regular computer paper for this project. I really did like using these sheets. They are lightweight, you can see through them, which is very helpful, and they tear off easily. I was skeptical about running them through my printer because they are so thin and kind of slippery, but they printed perfectly. The package of 25 sheets will last me a while since I don't do a lot of paper piecing. I was glad I had a good coupon to use, and it was nice not to have to wait for something to be shipped, so it was definitely convenient for me to be able to go pick them up at JoAnn's and start sewing right away.
Do you like making mini quilts? Even if you don't like making them, surely you love seeing them! Here is the list of Island Batik Ambassadors - you will love their Mini Madness posts, too.
I have a lot of quilts that have never made it to my blog that I would really like to document, so I am going to try to add an occasional post about them.
This star quilt was made in 2005 for my daughter Tracy after she graduated from high school. I gave it to her when she left to live with her sister in Portland and go to school. This quilt was made as a Round Robin block exchange I made with a group of friends. I asked for bright stars on black backgrounds, and was really happy how all the blocks went together - I added the center and an assortment of different black tone on tone fabrics. She requested a puffy tied quilt, so that's how it was finished.
When we visited in November last year, I saw that the corner fabrics on the center square had ripped. All the rest of the fabrics look great, so I think that the fabric I used must have been not very good quality. I brought it home to fix it up so she can continue to use it. It's still in very good shape except for those squares!
To repair it, I cut 8 1/2 inch squares of black fabric and appliqued them by hand over the ripped squares. I left the background triangles, since they still seem to look all right.
I'm glad I used a variety of black fabrics because the deeper black in the corners doesn't really look too bad! I have learned that tied quilts are cozy and soft, but they don't hold up quite as well that quilts that are quilted, either by hand or machine. This one has two layers of poly batting and the backing is a sheet. It is probably a double size quilt.
I'm so happy that Tracy will be able to use and enjoy this quilt again, and I'm really grateful that I have the chance to add it to my blog! I have quite a few pictures of quilts that I'll try to add as I have time - it's a great way to have a record of them so I can remember the details of how and why I made them.
I had a lot of fun with this alternate block that uses a four-patch unit. There aren't a whole lot of choices, but this one really caught my eye. It doesn't use background fabric, but relies on a light, a medium and a dark fabric with a contrast. If you struggle with choosing fabrics in dark, medium and light values a great tip is to use your digital camera or cell phone using a black and white setting.
This can really help a lot because it totally takes color out of the equation and lets you focus on value.
Both of these sets of fabric would work, but I ended up going with the last set because I felt the lighter rings in the first one made it look a bit lighter than I wanted.
Doesn't the black and white help you see the value better?
To make this block you will need a 2 x 15 inch strip of yellow and a 2 x 15 inch strip of medium blue, a 2 x 17 inch strip of light blue and a 2 x 17 inch strip of dark blue, and a 3 1/2 inch square of dark blue.
Sew the yellow strip to the medium blue strip and sub-cut into four 3 1/2 inch squares.
Sew the light blue and dark blue strips together and make four 3 1/2 inch four-patch blocks.
Arrange your units like this:
Then sew your block:
It's a simple block, but I love the way the values in the colors work in this. Come back next Monday for another block using four patch units.
This week's challenge for Project Quilting is the final one for the season. I think this is the first year that I've actually been able to keep up and finish all the challenges, so I am giving myself a big pat on the back for making it!
I won a prize from the fourth challenge (Brighter the Better) and was delighted to receive a mini charm pack along with a set of numbered pins - those will really come in handy! Thanks, Kim!
When I started this challenge there was one particular fabric I knew I wanted to use. It's one of those last bits of favorite fabric that I've been hoarding, and it was perfect for the theme. Then I was reminded of a long overdue promise that I needed to keep and knew exactly what I wanted to make!
I started off with a mini dresden plate in fun colors.
After I handstitched it to the background fabric, I outlined it with machine quilting and quilted swirls in the background fabric.
Oops, forgot about the center, better take care of that before I go any further! This is where that special bit of fabric came into play.
Isn't it perfect for the center? Do you know what I am making yet? It's a quilted journal cover! I also used that green for the pocket.
I like how you can also see the clocks on the notebook inside. I also used the green for the binding.
Here is the finished journal.
I will be mailing this out to Kathy E this week. She purchased the 1500th item from my Etsy shop before the end of the year. I promised to send her out something special, and it managed to slip my mind - it's about time I got it done!
Come see all the entries for Challenge 6! It's really fun to browse through them, as there are many creative quilters participating! As usual, I created my entry here in Coos Bay, OR, The journal cover measures 10 1/2 x 7 3/4 on the front.
I had a bit of a busy day today - first of all, it was Bunco day. We had a fun St Patrick themed game, and I got four Buncos, making me the winner!
I got to wear the funny headband for lunch afterward, too! I don't look very happy, do I?
Then I spent the afternoon working on zippers - yuck, but I only have 3 to go now and I'll be ready for the fittings on Tuesday. When I got that done, I rewarded myself by working on finishing my Savannah top.
I finally decided on the layout and sewed all my blocks together!
So now I just have to add the borders. I'm supposed to have an inner border fabric, but don't remember what I picked! I will dig through my stash tomorrow and see what I can find. At this point I'm ready to just get it together. I have some other projects I want to work on now, so it will be good to have this off my design wall finally - close enough to a finish for me at this point! I am linking up with Busy Hands Quilts for Finished or Not Friday!
Today's another Furry Friday for the Island Batik Ambassadors. This weeks pets are Tigress and Crysta.
Tigress is a very loving, very sweet tri-color Tabby. She follows you all around trying to get your attention and love! Isn't she a beautiful girl?
Crysta is a beautiful 8-year-old shepherd mix can be a bit shy at first, but warms up quickly. Crysta is a calm, friendly girl who likes to go for walks and to be petted and loved on. Meet her at the Humane Society of Missouri in St. Louis!
Hopefully we can help these two sweet pets find good homes soon! This is our second Furry Friday. Each Friday for the next six weeks, we will share pictures of shelter pets that need a home. Now they may not be in your area, however, if you are looking for a pet, you can go to the Petfinder.com page, put in your area code plus what type of pet you want and you will find a listing of all the pets needing homes in or near your area.
Here are the Island Batik Ambassadors who are hosting Furry Fridays this week:
Not everyone can adopt a pet, but if you would like to help you can make a kennel quilt and donate it. The Quilt Pattern Magazine will be hosting an online kennel quilting weekend March 18th-19th. Click here for more info! A great way to spend Worldwide Quilting Day!
Have a wonderful day, whatever you do, and hopefully it involves working on a quilt!